social media links

Tuesday, April 29, 2014

Bess Skater Dress MashUp Tutorial


Happy Selfish Sewing Week!  To start the week off with a bang I am finally posting this Bess Skater MashUp.  My computer is on its last legs and is pretty angry with me that I would try to perfect these diagrams so it's taken ages for me to get this post up.  It's totally worth the wait though, cause you NEED a Bess Skater dress in your life.  It's my new favorite dress.

Friday, April 25, 2014

Monthly MashUp (4) Giveaway Winner

Hey guys, I'm just popping in to announce the winner of the April Monthly MashUp Giveaway.  Rafflecopter chose Adrienne for liking Imagine Gnats on Facebook.  If your name is Adrienne then check your email, hehe.


I know I said I'd post the Bess Skater Dress MashUp details here this week, but my computer is giving me fits so I've pushed the post to Monday.  It'll be the perfect start to Selfish Sewing Week (April 28 - May 3)!


That also gives you a few more days to add any MashUps you've made this month to the Flickr pool.   I love to feature the lovely things you are making and it doesn't have to be the specific MashUp I made.  As long as you've combined two or more patterns it qualifies!

Thursday, April 17, 2014

Monthly MashUp (4) Bess Top and Lady Skater

If you're looking for the details of this monthly series you can check out the introduction post.

Monthly MashUp - with Call Ajaire

With Selfish Sewing Week coming up next week and Mother's Day in the U.S. less than a month away, I thought April's Monthly MashUp should be geared toward us ladies.  The patterns I chose are favorites of mine and the marriage between them makes me even more happy!  It's the Bess Top by Imagine Gnats and the Lady Skater Dress by Kitschycoo.

Wednesday, April 16, 2014

Krazy For Kat!

This post is dedicated to celebrating my friend Kat and her newest little Chibi!  Akira is a lucky girl to get to join the ranks of Azriella and Sephira and a virtual baby shower of sorts is WAY overdue.  So pardon me while I go a little Krazy for Kat.


Thursday, April 10, 2014

Shortie Nightgown and Bloomers

I have the cutest new pajama pattern to share with you today.  It's the Shortie Nightgown & Bloomers pattern and I'm excited to be a part of the tour.


The pattern is by GYCT Designs and Chelsea of Get Your Crap Together is on fire with her designing skills lately.  This is an adorable nightgown and bloomers set that doesn't require any closures so it's a super simple sew.  And so cute on.


The back yoke is open at the neck with a slight overlap which makes getting it on and off really easy.  You can add a snap or button if you like, but it isn't necessary.  And who needs any extra hassle at bedtime? hehe


I made the size 3T Shortie Nightgown and size 4T bloomers.  Bean is still growing like crazy and I'd love these to last the summer.  It's a bit big on top right now, but that just adds to the cute factor.  And the bloomers are a perfect fit with plenty of room to grow since they are elastic banded.


The little lamb fabric and this pinky floral will be perfect for our Easter trip to visit Bean's Nana in Tennessee.  The weather should be great down there so this little summery pj set will be just the thing to wear to sleep.


Bean thought it was hysterical that I would be taking pictures of her in bed and she started jumping around like crazy.  The jumping began immediately after I took the picture above and you can see the fire in her eyes as she came up with the idea.


And here she is mid jump.  The picture is blurry, but it's clear she's enjoying these pajamas!

GYTC Designs is giving away 3 Shortie Nightgown pdf patterns so just enter the Rafflecopter giveaway below:
 a Rafflecopter giveaway

If you want your pattern right away, you can get it for 20% off using code "SHORTIE20" during the tour.  Speaking of tour, make sure to click on the blogs listed below to see more cuteness on the tour!

 
I am not an affiliate of GYCT, but I was given the pattern for the tour.

Tuesday, April 8, 2014

Make Your Own Fabric - Project Run & Play Week 3

Thank you to everyone who has continued to vote for me in Project Run & Play!  If you like this week 3 look, please take a moment to vote for Call Ajaire: No Scrap Too Small here before Thursday night.


I recall this story one of my mother's friends told us when I was in high school.  There was an older lady who had passed away and as her family was going through her sewing things they came upon bins of fabric.  One bin was full of teensy scraps and was labeled "too small to use."  We all got a big chuckle out of that.


I think about that woman all the time and how she couldn't bear to part with even the scraps she declared too small.  As someone who is a borderline fabric hoarder I can completely relate.  To a scary degree, hehe.  For those of you who quilt especially, you know how hard it can be to toss out the small bits that result from squaring up your blocks or for cutting triangles.  Well this project is basically a way to use every last piece of your fabric.


It started with an idea I had after watching an episode of Under the Gunn where I was going to try to use some tulle as a sort of netting to hold scraps down on a piece of muslin.  I was working out the plan in my head when my good friend Amy sent me this pin.  And it was PERFECT.  Without the tulle layer all the scraps would be free to shine on their own as their brightly colored selves.


I started with a big piece of muslin that was about 3 inches bigger than my skirt pattern piece on all sides.  I put two pieces of wash-away stabilizer over the muslin and basted along the outside edge.  Then I stuffed all the scraps under the stabilizer through overlap of the two pieces.  For the skirt piece I stuck to a blended rainbow pattern.


For the bodice pieces I used only the pink shades of scraps.  Once everything was where I wanted it to be I pinned a few spots and brought the whole thing carefully over to the sewing machine.


Then I stitched through the layers in a small grid pattern.  I used 3/8 inch so the squares would be small enough for the thread to keep everything held down.  Even that piece of cording leftover from last week's headband made it into the mix and the stitching was enough to keep it firmly in place.


You can see on the back of the pink piece how the grid looks on the muslin side.  Everything isn't perfectly lined up, but it's just right for this scrappy project.  You could also do free motion quilting with this process which would be really cool.


Once everything had been stitched it was time to soak the pieces so the stabilizer would dissolve.  This part was so scary.  I had already put in so much time and the project was down to the wire (I didn't get the chance to start until Friday!), so there was no time for it not to work.  The stabilizer just melted away and after a couple of rinses I was left with just fabric.


Luckily it worked exactly as I had imagined it would.  In the picture above you can see how wet it still was, but the colors were so vibrant it was all I could do not to Instagram a sneak peek!


I just love seeing all of these fabrics I've used over the past few weeks.  I think this would be a cool way to do an "i spy" sort of quilt too.


It took a while for the fabrics to dry, so in the meantime I drafted the dress pattern.  I used the skirt from the dress I drafted here and modified the bodice.  I extended the bodice down so the dress would be drop-waisted and changed the armscye to allow for a faux cap sleeve instead of an inset sleeve.  I then split the bodice horizontally at the under arm so I could use the pink scrap fabric for just the upper bodice pieces.


Once the fabrics had dried, I cut out the pattern pieces.


The skirt looked so neat and I was really excited at this point.  The weight of the skirt fabric is about the same as a heavy denim.  The pink scrap fabric is much lighter since I didn't layer it as much, but I wanted the skirt fabric stuffed with as many scraps as I could fit.


The bodice of the dress is fully lined with the same fabric I used for the lower bodice sections.  It's a white stretch sateen which is one of my favorite fabrics.  It has a subtle sheen to one side that I thought would fit nicely with all the bright colors of the scrap sections.  I chose white so that the scraps would really stand out too.  And since sateen is a bottom weight it really helps hold up the weight of the skirt.


The sateen has a bit of stretch to it so the bodice is soft and Bean is really comfortable moving around in it.  The skirt fabric is just heavy enough to maintain a great twirly shape, but not so heavy that it pulls at the bodice at all.


I had hoped the daffodils would be up in time to take a pretty spring flower shoot, but the cold has stalled the bulbs a bit.  We lucked out with a sunshiny day at least.  Those daffodils will be blooming any day now.


I love how a drop waist looks with her baby belly.  And the extended bodice should mean Bean can wear this dress for a while.  After all the work I put in creating the fabric I didn't want her to outgrow it before the summer even gets here.


The invisible zipper extends down below the skirt which will make it easy to get her growing body in there for some time to come.  I was worried the bodice top and skirt edges wouldn't line up well across the zipper, but I was determined to make sure she could wear this dress with ease.


Everything lined up perfectly on the first try which really speaks to how easy this scrap fabric is to work with.


Finally, instead of hemming the circle skirt I used my favorite method to make some double fold bias tape and bound the edges.  The fabric is a cast-off from last week's look.  I bleach-dyed some red fabrics to try to get the perfect color for the capri pants and this attempt ended up too berry to be a Nantucket Red.  It was just perfect for this dress and since I had modified the original fabric it fit in well with this week's theme too.


Now the real danger is when my brain starts cooking up ideas of what to do with these scrap fabric "scraps", hehe.


I am so pleased with how easily this whole look came together from concept to creation.  If you like how I interpreted this week's theme please vote for Call Ajaire: No Scrap Too Small over at Project Run & Play through Thursday evening.  It'd be amazing to make it through to the final three!

Monday, April 7, 2014

Perfect Pattern Parcel #2

I am not an affiliate of Perfect Pattern Parcel, but I received these patterns for this tour.  All opinions are mine.  Also PPP is awesome.

Perfect Pattern Parcel

I am super excited to a part of Perfect Pattern Parcel #2.  If you haven't heard of Perfect Pattern Parcel, here's a quick description in their own words:

Put together two entrepreneurial makers driven by their internal voices and one self-taught hacker driven by data analytics , and Perfect Pattern Parcel was born. We are passionate about supporting independent designers in their craft and fostering a community of makers to grow. Our mission is to offer high-quality pdf sewing patterns written by indie designers while supporting children's education.

But the best part about PPP?  They donate funds raised from each sale to Donors Choose which is an organization that matches up the needs of teachers and their students for specific projects with willing donors. 

Perfect Pattern Parcel #2

Parcel #2 two contains 5 patterns which can be mixed and matched in enough ways to completely outfit your little girl for spring.  Just look at this list of patterns:

Hanami Top or Dress by Straight Grain
Hosh Pants by LoubeeClothing
Celestial Tee by Figgy’s
September Tunic & Dress by Too Sweets Patterns
Caroline Party Dress by Mouse House Creations

With this parcel if you choose to pay at least $24 you will automatically receive this BONUS pattern:
Prefontaine Shorts by Made With Moxie

Now you all know I'm obsessed with Hosh Pants.  Just take a look here, here, and here.  But Sarah has extended the sizing to go up to 6 so I'll make plenty more before Bean is too big for Hosh.


When I received the patterns I jumped at the chance to make a Caroline Party Dress for Bean.  It's such an adorable classic shape and I knew a Mouse House Creations pattern would have excellent attention to detail so I couldn't wait to sew with it.  I love a well done tutorial and this does not disappoint. 


I made the simple neckline dress with a full bodice lining and underskirt.  If I have Bean wear this one for her birthday, then I'll add a bunch of tulle to make it poof a bit more.  If you haven't sewn with tulle before, don't worry because the pattern does a great job of explaining how to add tulle to the underskirt.  I made it in size 4T because at the rate Bean is growing she would have outgrown a 3T by the time her birthday came around in may.  It fits great with a little extra room in the bodice now so it'll be perfect this summer.

Perfect Pattern Parcel #2

I can't wait to sew more of the patterns from the parcel.  In the meantime, Bean and I have been having fun coloring in the super adorable paper dolls made in honor of the sale.  The free printable is a great way to get your kids excited about mixing and matching the PPP patterns.

Grab your parcel soon as the sale will be over in less than two weeks.  Don't forget to stop by the other ladies on the Perfect Pattern Parcel tour today: Lexi Made and sewVery.

Tuesday, April 1, 2014

Spring Break Challenge - Project Run & Play Week 2

I made it through to the second week of Season 9 of Project Run & Play! If you like this week's outfit, please take the time to vote for my Cape Cod Casual look before Thursday night!


This week's theme is Spring Break or your favorite vacation spot so of course I picked Cape Cod.  For those of you who don't know, I was born and raised on the Cape (in the house where our mother also grew up) and it will always be my favorite place - vacation or otherwise.  Since the theme was Spring Break and it's not exactly hot in Massachusetts in the spring, I stayed away from bathing suit/beach wear and stuck to a very traditional (and really en vogue this spring) Cape Cod casual look.


We headed to Annapolis for a photo shoot since that's the closest thing to the Cape we have here in Maryland.  It was raining and unbelievably windy so there weren't too many great photos to choose from afterward, but we had fun laughing at just how ridiculous the weather was.


It was also 40 degrees so Bean did an amazing job of smiling and posing out in the cold.  By the time we got back to our house there was an inch of snow on the ground so maybe it wasn't the best day to plan a harbor photo shoot, hehe.


My favorite part of this look is the Nantucket Red capri pants with a "critter" style embroidery on them.

these are the true to life colors even though the capris look really pink in some of the photos

It was difficult to find the right shade of red so I bleach dyed some jeans fabric to get that pinky/berry/more-red-than-salmon color.  And of course if I'm going to choose a critter to embroider then it's going to be a panda, hehe.


I designed a little baby panda profile and hand embroidered them onto the fabric prior to cutting out the pants.  The embroidery was done on the front, back, and waistband pieces, using a dark navy and white dmc floss.  As I embroidered those pandas, I tried to make them each a bit different so it'd be easy to tell they were hand stitched.  Bean literally squeaked when she saw all those little pandas.  It was all I could do to get her not to pet the teeny pandas on her pants the whole time I was trying to take pictures.  It was worth all the time it took to finish them to see how much she loved her panda pants.


The pants themselves were modified from a self drafted pair of pants I made for Bean way back when she was just learning to stand.  I took my pattern (originally used for knit fabric), graded it up, added some ease, made side vents at the ankles, and created a working zipper closure.


I was going to add a button closure to the capris, but once they were sewn together I thought a button would distract from the panda waistband so I opted for a hook and bar instead.


I added functional welt pockets to the back to match the angle of the yoke pieces.  I have to give a quick shout out to Melissa from Blank Slate Patterns whose Clean Slate Pants first taught me how to sew a functional zipper AND the best way to make a welt pocket.  I've used those skills a ton over the past two years so I highly recommend that pattern (*affiliate links).


For the blazer I took the bodice I designed for the black shirt from last week's look, added princess seams, split the front, lengthened the sleeves, and added the collar extension.  I used the same nifty method to attach the collar lining as in the 
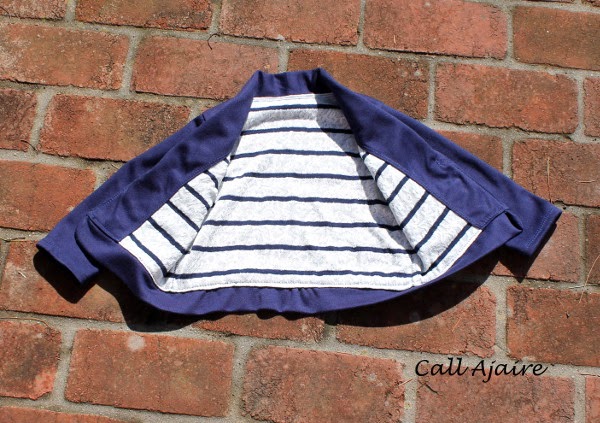
BBC Vest (*affiliate link) pattern from Shwin Designs.  The fabric is a navy ponte de roma which is a little more casual than a woven making this cropped blazer comfortable and perfect for a little girl.  Even though I was nervous about welt pockets with the knit, the seams above and below the pockets lined up really well and there wasn't any stretching so the ponte de roma was a good sturdy choice.


The lining is made from a lace and stripe fabric I found at JoAnn Fabrics.  The lace portion is in a soft knit so it isn't irritating to Bean's skin.


The finishing touches are a large button from my stash attached in the center of the blazer so the bottom could fan out over Bean's belly to expose the shirt, and a band around the bottom with some small gathers in the back.  The sleeves are cut shorter than wrist length, but longer than 3/4 so they would offer some coverage, but not be too long for a spring/summer look.


The blazer lining fabric was originally bought with the boatneck shirt in mind.  It's the perfect blend of traditional nautical style and modern flair.  Again, I used the bodice pattern I drafted for last week's look, widening the neckline and changing the sleeve cap to fit without a gather.  The sleeves are a little longer than 3/4 length and unlined.  The bodice is lined with more of the ponte de roma navy to really allow the white lace stripes to stand out.


The accessories really pulled the whole look together.  Bean's spring Toms are a boat shoe style that I'm completely in love with and were perfect with the outfit.


It's hard to see in the pictures, but I made a traditional braided rope bracelet with a gold flecked cording.


Using the same cording I made a Josephine knot (a traditional sailor knot) and then glued it to a headband.  I left the edges of the cording frayed because I though it added to the casual feel.


And my absolute favorite is the infinity scarf.  I am really into mixing patterns and I thought this floral cotton lawn from Imagine Gnats (this color is now unavailable) looked so good with the lacy stripes.  This is one of my favorite fabrics I've ever bought and I was so pleased to be able to squeeze out one more thing with the leftover scraps.  The infinity scarf is perfect for spring and Bean loves wearing it.  She loves scarves in general, but after retying her other scarves over and over I thought an infinity scarf was the best way to go.


I hope you love this look as much as I do.  If you would like to vote for my version of Cape Cod Casual, you can do so here before Thursday night.  Thank you in advance!!