social media links

Thursday, August 22, 2013

Flip This - Drop Waist Tinny

It's yet another Flip This Pattern monthly sew along deadline and boy did I cut this one close.  I've even had the pieces cut out and ready to sew for over a week and still didn't get started until naptime yesterday.  This morning I marathon sewed together what I didn't finish in the short hour yesterday and I cannot believe how smoothly everything went.  This is testament only to the original pattern, because nothing ever goes quite this smoothly for me.  Every seam matched up just perfectly. 


This month's pattern to flip is Straight Grain's Tinny Dress.  There are already many different sleeve, skirt, and collar options included in the pattern so it made flipping it a little tricky.  Right away though, I knew I wanted to drop the waist with the circle skirt.


I extended the pieces for the bodice about four or so inches, keeping the same slight curve along the bottom edge.


Then I shortened the skirt by about five or six inches since I knew I wanted this dress to be a little shorter than the original.  In the picture above, the top piece is the original pattern piece and the one below it is what I used.


I've had this gingham apple fabric seemingly forever and I've gone through phases of loving it and then wondering why I ever bought it.  Recently I was going through my stash, saw it, and immediately fell in love again.  I really like how it looks on the bias, so that's how I cut out the bodice pieces.  I think it's so much more interesting than if it were cut in the "correct" direction.


The apples are shaded in different colors of red so I used a bright red for the skirt, sleeves, and collar and then a darker maroon colored shirting for piping to add some depth and tone down that bright red.


Since I was using such a great bright color red zipper, I decided to have it exposed in the back and not run down the entire back to the skirt, but just enough to help get the dress on and off.


I used the tulip sleeves, but instead of attaching them so they would be turned up as a cuff, I shortened the sleeve a bit and then attached the "petals" so they would turn down.  I really like how this looks on Bean more than just on the hanger.


The butterfly peter pan style was what I used as a basic template for the collar, but I did less of a curve at the shoulders and flattened it out a bit instead.  This way it looks more wavy than butterfly. 


I think the length turned out just right for the drop waist style I was looking for.  A bonus is that this will look adorable as a peplum-ish top with a pair of jeggings later this fall.


We rushed to take pictures right after Bean woke from her nap this afternoon, so she was a little out of it still hehe.  She loves the kitties at the farm though.  They are extra friendly and rub against her and let her pet them as much as she wants.

Flip This Pattern

This month there were four competitors in the viewer's choice category and they were all amazing.  Voting will be up until the 25th so don't forget to vote for your favorite of the four flips.  I'm later than I'd like in entering the sew-along, but there are so many great looks in that linky that I can't wait to click on and check out.

**Update this was featured by the Shaffer Sisters!

Shaffer Sisters encourage. inspire. uplift. create.

As usual, linking up to:

I Heart Nap Time The Chicken Chick Shaffer Sisters encourage. inspire. uplift. create. Photobucket  photo blogbutton_zpsb1fa0f6d.jpg Happy Hour Projects Photobucket

Monday, August 19, 2013

Summer of Bubble Pockets

Since I left things off last week with two reposts, I decided to continue my summer wrap-up week into this week with a few more "new" posts.  We're now on day six of the wrap-up and moving on to Bubble Pocket Shorts (*affiliate link).

I made several different pairs of Bubble Pocket shorts this summer and it's hard to decide which one I like the best.  They are a really great style and fit and even though they look extra complicated the pattern whips together so it's a big win.  Other than the Doli tank, these shorts are by far my favorite pattern for Bean this summer.


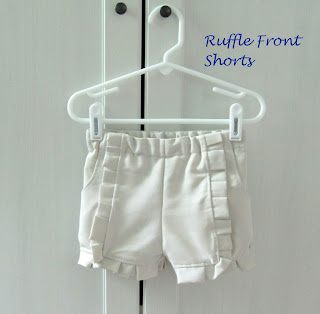
I already showed you my Flipped Ruffled Front Pocket Shorts and these were the second pair I made.  I was really pleased with how the ruffled pleats worked out with the shape of the front.


The first pair I made were actually blogged about after the flipped ones.  Paired with a matching Doli Tank they were a huge hit this summer.


The next pair were made out of leftovers of the same old navy sweater that I made Bean's Anywhere dress out of in the spring.  I love the soft feel of the sweater fabric with these shorts.  They must be the most comfortable shorts to wear ever. 

via Instagram

Bean wears them all the time and they've quickly become the go to shorts I grab out of the closet.


They look super cute with the Peter Pan Collar Tee (affiliate link) and you may have already seen them on her when I blogged about the tee here.


The most recent pair I made from and old pair of khakis that were too worn for my husband to wear to work anymore.  These are the first "sailor style" that I've made and I know I'll be making a couple more next summer. 


I was worried about the buttons being too much of a pain to open every time Bean needed to go potty, but with the button hole elastic (too bad I didn't know that stuff existed way back when.  I first saw button hole elastic inside the legs of one of Bean's cloth diapers and I did a big forehead slap and grabbed some at the store the next time I was there.  duh) running through the back waist these actually come up and down without even having to undo the buttons. 


Although when you do undo the buttons, you see that I used a cute contrasting fat quarter that I had on hand to line the flap and the waist band.  I love these little touches.  I even made the buttons out of some left overs of the pants that were upcycled for the flipped pocket shorts.


This picture was taken at the farm down the road, but Bean wore these pants in some family pictures we took when we visited Massachusetts this summer.  She wore the Peter Pan Collar Tee as well just because I cannot get enough of how cute they look together, hehe.

Friday, August 16, 2013

Lattice Smocking {Project Run & Play Guest Post}

I know, I know.  Another "post" where I'm just bringing home a guest post.  Well, this was a big one because it was guest post over at Project Run & Play and we all know how much I LOVE them.  So for day five of my summer wrap-up week I present an intro to my lattice smocking tutorial with a tip for making a dress from a smocked bodice:

*********************************************************************************

I'm Ajaire from Call Ajaire and I'm very excited to be guest posting here today.  As is probably the case for most of the sew along at home-ers, I've found Project Run & Play to be an enormous source of inspiration. 


My two year old daughter was just a little (chunky!) baby when I first started following along and it gave me just the kick in the pants I needed to start sewing for her.  What a shock it was to realize how much simpler it is to make kids clothes vs clothes made for adults to wear.  I was hooked!


Now that my girl is a little older I've found it is so rewarding to see her run around in something I've made.  I have so much fun designing an outfit from start to finish, but I'm also so grateful to all of those pattern designers out there.  They are a great jumping off point and PR&P's remix posts are a fun way to take that leap. 


Today I'd like to focus on a detail I've used a number of times over the years.  It's a detail that could be easily added to the neckline of an existing pattern if you're not feeling brave enough to draft one yourself. 


It's lattice smocking.  I have found it's a great way to add a fancy look to a solid colored piece of fabric.  Unlike other traditional methods of smocking, lattice smocking is quick and easy once you get the details worked out. 


It is worked on the WRONG side of the fabric over a grid of dots and hash marks with regular thread.  I have finally put my Lattice Smocking Tutorial up on Call Ajaire, so if you're interested in how it comes together then I'd love you to drop on by.


I do have some tips for adding this detail to an existing pattern.


Start with a piece of fabric slightly wider than the bodice pattern you are going to use.  Lattice Smocking does shrink the fabric width and length, but not as dramatically as some other types of smocking.  I'd say maybe 10-15% shrinkage?  So account for that before you start the smocking.  Another good idea is to keep the pattern piece close by while you're smocking so you can check the width as you go.


Once the smocking is complete you will take the smocked piece of fabric and place the pattern piece over the fabric making sure that the smocked section is where you'd like it to be along the neckline.  It may be a little tricky to get the pleating detail at the top (created by the smocking) to want to play nicely with the pattern, but even a simple gather along edge should be enough to get it to fit in the binding or facing you are using. 


A big thank you to the ladies behind Project Run & Play.  That includes those who are behind the scenes, part of the actual competition, the judges, as well as the sew along-ers.  You've all been such an inspiration to me.  Not to mention all of that fabric I've been hoarding stashing all these years is finally getting put to good use too, hehe.

Thursday, August 15, 2013

Polo Dress Redo {Make for Mom Series}

For day four of my summer wrap up week, I am bringing home the post I wrote for Shaffer Sisters' Make for Mom series they ran earlier this summer.  I love those Shaffer ladies.  They have a great dynamic and I really enjoy their variety of posts.  They also have been doing a link up party every Tuesday this summer so you should check out the inspiration over there.

Before I start the original post I wanted to update and say I wore this dress ALL SUMMER.  It was a great, comfortable, and most importantly successful redo.  Now on to the post:

********************************************************************************
When I was thinking of what I would "Make for Mom" I decided to go through my closet and find something I don't wear anymore and make it wearable.  Lets be honest, now that I am a mom there are a few items in there that my child-bearing hips are not meant to wear, hehe.


One of which is this old polo shirt dress.  I'm still happy with the look of a polo shirt on my body shape, but the bottom half of the dress is rife with issue.  The length is too short, there is pulling in between the snaps from the bust down, and the shape is completely unflattering.  This was a perfect candidate for a remake.


I started out by deciding how high up I wanted to cut the bodice.  Then I just drew a chalk line and used my rotary cutter to cut between the snaps.


To fix the gapping between the snaps I decided which was the last snap down that I would use and sewed the sides shut below that point following the pink lines on the cut bodice in the above picture.


Since I wanted a more flowy skirt I went for this poly blend I found at JoAnn Fabrics.  There is a tiny strip of silver metallic thread in between the stripes, so in person it is a lot less "Ernie" from Sesame Street, hehe.


I turned the fabric to the bias (diagonal stripes in this case) so the drape would be better for my shape.  In order to decide how wide to cut the skirt waist, I measured on either side of the width of the polo bodice (in the picture above, you can see that I hadn't cut the skirt off the polo yet) and added a bit for seam allowance.


This was all sort of on the fly, so I don't have exact measurements.  The good thing about this type of fabric however, is that it is so forgiving once it's sewn together with the way it drapes that I've found being exact isn't so necessary.  I simply cut a sort of wide A-Line shape from the top of the waist down to a maxi length on one side.  I don't have a picture of the next step, but I just folded over the cut side at the center point of the waist measurement, and used that shape to cut the same angle on the other side. 


In order to get the shape I was looking for, I thought adding a gore at each side seam would do the trick.  So I simply cut two long triangles from the leftover bias fabric.  The only thing I thought about was that the length should be roughly the length of the skirt panels I'd already cut AND that the top of the triangle should come to a narrow point (the bottom right hand corner in the above picture) since I didn't want to add any width at the waist which is where I would insert the gore.  Again, I didn't use a lot of precision since I wanted this dress to be casual and I knew this fabric is forgiving.

I don't have any pictures of the next few steps since I was trying to get it sewn quickly while my daughter was napping, but here's a quick rundown.  I used my serger for all the seams, but you could use a stretch stitch on your regular machine. 

I unpicked the seam on both sides of the polo bodice about two inches from the bottom so that I could attach the skirt.  Then sewed the back bodice to the back skirt panel with right sides facing.  Then did the same for the front bodice and skirt panel.  At this point I tried it on to make sure the fit would be correct with the length of the bodice and to be sure I wanted to include the gores.  The side seams weren't sewn yet, but I could still approximate the fit.  Then I sewed one gore to each side of the front skirt panel, starting with the tip at the new seam where the bodice and skirt meet.  Then I matched the other side of each gore up with the corresponding back skirt panel and pinned.  Starting at the point on the bodice where I had pulled the stitching I sewed the final seams, closing the bodice seam opening as well.


This is the back of the final dress.  You can see that I haven't finished the hem yet.  Since it's a knit, it won't fray so I could leave it as is, but I'll probably do a simple roll over hem or something like that.  I'm having trouble deciding so I'll leave it as is for now.


And here is the front.  If I had taken more care, I could have made the gores have a different stripey shape, but you'll see that once it's on my body and the skirt is draped that it doesn't really make a difference.


It's hard to show in a picture just how flowy the skirt is with the help of those gores.  The dress is very comfortable to wear and a huge step up from the original.


I'm really happy with this Polo Dress Redo.  I think it'll be great for the casual BBQs and birthday parties that abound this May.  Thank you Shaffer Sisters for having me and giving me the push I needed to make something for myself!