social media links

Thursday, February 13, 2014

Floor Cushion - Outer Removable Cushions

Finally, here is the post about the Valentine's Day Removable Floor Cushion Covers I made for Bean.  I posted yesterday about how to make the inner cushion, last week about the invisible zipper band, and now today we get to focus on the fun part.


To make her floor cushion more Valentine themed I decided to make it in the shape of a heart.  I made it a chubby heart so it'd still be a roundish shape though, hehe.  I used some home decorating weight fabric from JoAnn that I had left over from the faux roman blinds I made for Bean's room when she was a baby.  (hmm maybe I should write a post about them someday...)  I thought it'd be fun to coordinate the cushions with her room.


I also made a round cushion cover so if we're not feeling Valentine-y we can swap it out.  Yes, that's two removable cushions and one inner cushion.  But really it all sews up so fast I was excited to do it.  The only hard part is getting all those beans in the inner cushion, but with my "funnel" technique we've already sailed past that step.  The rest is gravy.  I'll start by describing how I made the round cushion because other than the closure, they are made the same way.


To make a round shaped removable cover for your inner floor cushion you'll need:

two circles with a 20" diameter cut out of your cushion fabric
piping (much more than shows in this picture - you can see how I made the bias tape for the piping here)
a band of fabric 10 inches high by about 68 inches
two rectangles of fabric 3.5" by 8" for making a handle (optional)
snaps (*affiliate link)


Step 1.  Baste the piping onto both of your circles.


Step 2:  To make the (optional) handle you need to sew the two smaller rectangles with right sides together leaving an opening for turning.  I added piping to the sides of mine which you could do before sewing them together.  Once your rectangle is turned right side out and has been pressed you will want to add it to the band.  It's much easier to add it now before the band has been sewn to the cushion pieces.


Step 3:  Simply pick a spot in the center (vertically) on the band and sew each side down securely as you see in the picture above.


Step 4:  Pin the band right sides together to one of the circles, leaving overhang on each end of the band.  You'll want at least three inches left over on each side.  Mark where the bands meet at the circle with a pin. (don't notch like you did with the inner cushion)


Step 5:  Move over to the ironing board and press down each side making sure that when you repin the band to the circle the two ends will overlap at least two inches.


Step 6:  Repin the band to the circle, overlapping the two band ends.


Step 7:  Sew along the perimeter of the circle.  Notch seam so it will turn nicely.


Step 8:  Pin the top of the band edges together so they are overlapping evenly with the bottom edge.


Step 9:  Pin the top circle onto the band right sides together making sure the overlapping band ends are pinned down as well.


Step 10:  Sew around the perimeter of the circle catching the overlapping bands.  There is no need to leave an opening since the opening at the band ends (from the overlap) will be what you'll use to turn the cushion cover.


Step 11:  Turn the cushion right side out and admire the nicely folded overlapping opening.  This will become your snap placket.


Step 12.  Get out your snaps and snap tool.  I really love this snap tool (*affiliate link) I bought last year for making my Simple Toddler Belts (spoiler alert there's video of me on that post, hehe).  I can't recommend it enough.  These plastic snaps are great for kids and I've stocked up on many colors.


Step 13.  Admire your pretty snaps.  It's hard to tell in this picture, but these pink snaps have a butterfly pattern embossed on them.  Super cute.

Now that we've finished the round floor cushion let's move on to the heart shaped one.  Many of the steps are the same, but I'll highlight the ones that are different.

To make a heart shaped removable cover for your inner floor cushion you'll need:


two heart shapes cut out of your cushion fabric - mine are about 30 inches wide by 20 inches high
piping (you can see how I made the bias tape for the piping here)
two bands of fabric 10 inches high by about 25 inches
a 10 inch high by about 15 inch wide piece of band which has an invisible zipper running down the middle
two rectangles of fabric 3.5" by 8" for making a handle (optional)


Step 1:  Baste the piping onto both of your heart shapes.  Take care around the points at the center.  You may need to clip the piping seam allowance to lay nicely on the points.


Step 2:  Sew one band of fabric to each of the ends of the invisible zipper piece.  Now you have one long band with an invisible zipper at the center and two open ends.

Step 3: To make the handle and sew it to the band please refer to Steps 2 and 3 for the round cushion above.

picture of the heart from last year

Step 4:  Pin the band to the outside edge of one of the hearts with right sides together.  Where the band ends meet you will notch the band and sew it together.  Please refer to steps 2 through 6 from the inner cushion tutorial for detailed pictures of this step.

another picture from last year

Step 5: Sew the perimeter of the heart to the band and notch the seams.  Take care at the points to turn the fabric and remember that clipping the seams will help it all to lie flat.  Flip the seam right side out to make sure the points look nice.

Step 6:  Pin the other heart to the band right sides together making sure to line up the points of the heart shape at the center.  Once everything is pinned you can sew and notch the seams just like in steps 9 and 10 of the round cushion above.


Step 7:  Flip the cushion right side out through the zipper hole and admire your lovely invisible zipper.

Now you have two cushion covers and an inner cushion made.  The only thing left to do is stuff the inner cushion into one of the covers.


Start by bunching up one end of the inner cushion and then push that into the cover.  The reason we made the inner cushion much bigger and not fully stuffed is so that it can be maneuvered through the small zipper and snap openings in the outer cushion cover.  The extra room in the inner cushion allows the beans to be pushed through the opening into the inner cushion section that is already inside the outer cushion.


Push as much of the inner cushion into the cushion cover as possible.  Then hold the whole thing vertical and try to shake the beans inside the covered section of the inner cushion.  This takes some finagling, but trust me it works.  Once you get past the half way point the inner cushion practically falls inside the outer cushion.


Once the inner cushion is fully inside the cushion cover just zip or snap the opening shut and shake the whole thing around until the inner cushion and its beans are snug into the edges of the cover.


So now that we're done (whew!) you may wonder why I went through all the effort to make a larger inner cushion and then jam it through a small opening in the removable cover.  I'll admit that it would be a lot easier to just use an extra long zipper or make a snap placket that went half way around the perimeter of the cushion and please feel free to make yours that way if you'd like.


However, I have an extremely curious 2 year old in the house who is adept at zippers and would be all too willing to try to get at that inner cover.  With a small opening there is much less chance of her getting in there and pulling out the inner cushion with all those beans!  So for me it was worth it to spend the extra few minutes to get the inner cushion inside the opening.  Let's do our best to keep those beans contained, hehe.
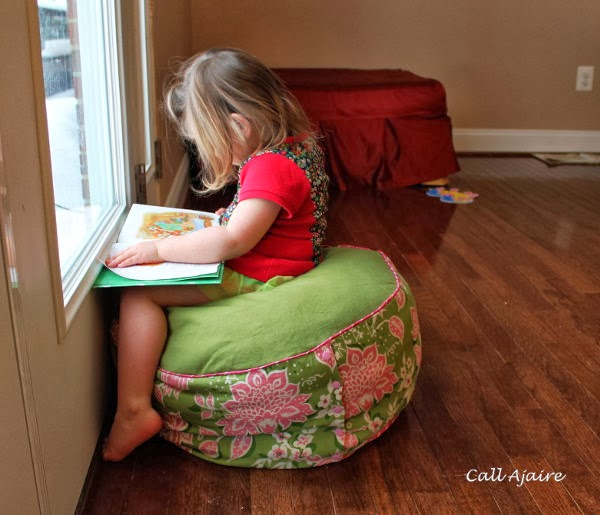

I gave Bean the round cushion cover this morning to keep her occupied during this very snowy morning.  She loves it!  I decided to give it to her early because I think it'll be more fun to have her see it "become" a heart shape for Valentine's day tomorrow than if I just gave it to her in its heart cover originally.  I've successfully hidden the heart cover for now.  I'm sure I'll post an updated heart cushion pic on Instagram tomorrow if you're curious to see how she likes it.

Wednesday, February 12, 2014

Floor Cushion - Inner Cushion

For Valentine's Day I decided to give Bean a floor cushion to go with the books I had already planned to give her.  Last year I made a fun floor cushion for one of our friends' little girls' birthdays and I had every intention of going back and making another one for Bean.  Time goes by, I never made another one, and I realize it's been a year so it's time to remedy that.


In order to be able to keep the cushion clean and throw it into the laundry, I thought I should make an inner cushion this time and make the outer cushion removable.  So I started with making the muslin which would be the inner layer.  I know I've teased this already here and here, but I've divided this into two posts because it was getting way too long with both the inner and outer cushion.  So today I will focus on the inner cushion and tomorrow I'll show you how I made the outer removable cushion covers.  And yes, that's plural (covers) because I made two.  But you'll have to come back to see why, hehe.  

When I made the cushion last year I didn't use a pattern, but since then I've seen a few posts on how to make a floor pouf that are great.  Living With Punks' seems to be the most popular on pinterest and it's really well done.

stuffing the inner cushion through the opening of the removable cover

I found through some trial and error, that it is best to have an inner cushion that is a larger shape than your outer cushion will be.  The reason for that is so that you can fill it with as many beads as you'd like the outer cushion to have in order to be comfortable, but still be able to squish the inner cushion inside the outer cushion with relative ease.  We'll go over those details in tomorrow's post.

Anyway, I decided to make my inner cushion out of felt.  This was mostly because I had a lot of it in my stash, but I also thought it would make the cushion even softer.  I like to keep a bunch of premium felt by the yard in a neutral color on hand.  You can usually find it at JoAnn Fabrics in the utility fabric section.  I find it's great for quilt batting in pinch (I used it for my Reversible Table Quilt), making quick hand puppets or felt ornaments, or for anything that needs a little stuffing.  It will most likely shrink so be wary of using it where you'd want to be washing it frequently and be sure to follow the care instructions.


To begin with start with two felt circles which have a 14"-15" radius (28"-30" diameter) -  one being slightly larger than the other - and a band 10" high by about 90" wide.  I do not plan to wash this inner cushion (other than spot cleaning if necessary) so I didn't worry about including a zipper or snap closure.  If anything I wanted all the beads completely contained with absolutely no way of getting out, hehe.


Step 1:  Pin the band to the smaller circle with right sides together all the way around leaving a bit of the edge loose to match up the ends.


Step 2:  Pinch where the two ends meet.


Step 3:  Clip the spot where they meet to make a notch and then unpin a small section of the circle to release the band ends.


Step 4:  Lay the bands out flat with right sides together.  Draw a line perpendicular the the top and bottom of the band from the notch.  This will be the sewing line.  Feel free to trim the excess away now or you can wait until you've sewn the band together and have checked the fit.


Step 5:  Sew the two ends of the band together in a straight line down from where you clipped.


Step 6:  Repin the band to the circle and it should fit just right.


Step 7:  Sew around the perimeter and then clip the seams so that the edge will lie nicely when turned.

Step 8:  Pin the bottom of the band to the larger circle the same way you pinned the smaller circle.  You will find that the band won't fit it exactly since you made one circle larger than the other which is what you want to happen.  There will be excess circle which will stick out like a funnel.  Sew the seam leaving a big section unsewn (about 4 inches plus the funnel shape from the larger circle) and trim the seams.  Flip the cushion right side out and it'll look like the picture below.


See that part sticking up?  It acts as a nice funnel for getting all the beans inside the bean bag in the end.  We'll fold it over and sew it up nicely later.  Keep in mind that no one is really seeing this part since it's the inner cushion anyway.  I had to keep reminding myself that it didn't have to look perfect.  It just needs to securely contain the beans and be squishy enough to squeeze inside the removable outer cushion.


Step 9:  Fill the cushion with beans.  I used these (*affiliate link).  I have heard really good things about them and have friends who have used them and their cushions have held up well.  They are basically teeny dense packing peanuts, but they are worth using.  I have previously made cushions using polyfil and they never hold their shape correctly and feel a little hard.  This 100 liter bag has enough beans to make at least two of these smaller sized cushions or one really huge one.


The bean filling job is tedious, but that funnel shape makes it SO much easier.  I've tried using an actual funnel before, but really introducing another tool to this process just adds to the number of things that will cause static.  It was a total disaster.  By just making a funnel shape with the fabric itself, the beans only have to get from the bag to the cushion without anything else in the way.  I rubbed a dryer sheet along the edges to try to curb the static, but it's Maryland in the winter so static is pretty much a given.  Make sure to fill the cushion only about 1/2 to 3/4 full.  Remember that you are only filling it as much as your outer cushion cover would require so occasionally hold the opening closed and smoosh it down to see how big the cushion will be.  You want the cushion to be comfortable to sit on so even once inside the outer cushion cover it should be fairly squishy and not stuffed full.


Step 10:  Once you have all the beans you think you'll need in there, simply fold the opening closed.  You can try to make the fold from the funnel shape of the opening as smooth as possible, but really it won't make a difference once it's stuffed inside the outer cushion.


Step 11:  Pin the fold and sew close to the edge a few times to really secure those beans in there.


And here is the gorgeous (hehe) finished inner cushion.  You can see in the picture above the fold that happens from the funnel shape.  Trust me when I say this won't matter later.  It's well worth the fold to make it easier to get those beans in there!


And now to tide you over, I'll leave you with this adorable picture of Bean with the cushion I made way back last February before it was sent off to its proper home.  She was so small and just look at those super chubby legs and cheesey smile, hehe.

**Update here is the link to the outer Removable Cushion Cover.

Monday, February 10, 2014

Make Your Own Bias Tape - Bias Piecing Method

I love homemade bias tape, bindings, and piping.  I think there's something fun about choosing which fabrics you'd like to use to give a pop to your project.  The bias tape you buy at the store is generally boring solids, the fabric feels rough to the touch, and it's way more expensive than I'd like it to be.  But I'll also be the first to say that making bias tape is tedious at best.  Here I'll show you my method of making the process much more streamlined.  You know, so you can move on to the fun part of actually USING it, hehe.


There are many methods to making continuous bias strips out there, but I'm convinced my method is the least complicated.  A popular way is to sew your fabric together in a tube and then use your scissors to spiral cut one long strip.  I've done it that way many times and it's a good method, but here are the issues I have with it:


  • I find I always spend time looking through my pinterest boards to remember which ends to sew together so I don't end up wasting my fabric.
  • I'm usually looking for a specific amount of bias tape and with that method it's a math mystery to me exactly how much will be produced.  
  • If you want to make only a small amount of bias tape the tube would have to be pretty small which can be tricky.
  • I'm not the most accurate with my scissors and tend to cut the lines a bit wavier than I'd like which makes it harder to create binding from the bias tape later.
  • I like to make bias tape out of scraps of fabric which makes using the tube method pretty much impossible.


My method addresses all of these issues.  The gist is that you can cut any length of fabric strips on the bias and use glue to temporarily hold your seams so you can sit at the sewing machine and speed sew them all at once.  Not just any glue, however.


It needs to be Elmer's school glue (*affiliate link).  Elmer's School Glue is basically starch so it doesn't get sticky and gum up your needle and will completely wash away the first time you wash whatever it is you're making.  My favorite is the purple glue sticks, but you can definitely use the white stuff that comes in a bottle.  Just make sure it's school glue.


Ok, here we go.  Start by cutting out strips of fabric on the bias.  Just to get this out of the way: the strips in this tutorial are not true bias strips.  I cut them on the straight grain, but for the purposes of this tutorial we can just pretend they're on the bias.  If you're not sure how to find the bias of your fabric you can check out this pin.  Cut any lengths that you'd like, but make sure you maintain the same width so the strips will line up correctly.  If you're not sure what width you want to cut you can check out this pin.  To make 1/2 inch double fold bias binding (1 inch single fold) I like to cut my strips at 2 inches wide.


Step 1.  Once you have all your strips move over to the ironing board and bring your glue.  One strip at a time, with the wrong side up, press one end over creating a 45 degree angle.  Leave the other end flat and proceed with doing the same to all of your strips.


Step 2. Apply school glue to the 45 degree angle.  You can see above where I put the glue since the stick glue is purple until it dries.  If you're using the white school glue you'll want to try to get as little as possible on there so as not to make a gloopy mess.  You really want the glue to dry just with the pressing of the iron.  It's totally doable, but I prefer the simplicity of the glue stick.


Step 3. Take your next strip and place the square end of that strip (not the angled one) right side down on top of the spot where you placed your glue.  You will want to be sure that the strip top and bottom edges match up nicely and that the top strip overlaps the bottom angled one just slightly.  You can see in the picture above that the little strip that is hanging below the bottom edge is the bottom of the 45 degree angled strip from the gluing step.


Step 4. Press with a hot iron for a few seconds to let the glue dry.  It shouldn't take more than 6 - 10 seconds.  Moving on to the 45 degree angled edge of the second strip (the one on top), repeat Steps 2-4 for the remaining strips.


When you are done you should have one long strip of glued sections.  As you can see in the picture above if you unfold the 45 degree angle you will have a pressing fold line with the strips glued together above and to left of the fold and free to move around below and to the right of the fold.  It is on this pressing fold that you will sew the bias strips together.


Step 5. Move on to the sewing machine.  Remember since you are sewing on the bias that you will want to make your stitch length a little smaller.  That will help to keep the seam from stretching too much in the wrong direction.  You will stitch in the pressing fold of each of the glued strips.  I like to speed stitch these by stitching down the fold and then pulling the next section around and putting it in line for stitching right after the completed one (just like speed piecing in quilting).


When you are done stitching all the seams, cut the threads connecting them and head back to the ironing board.


Step 6.  All of the stitched seams will look like the one in the picture above.  You need to pull the two glued sections of the bias strip apart.  Since it's just school glue they should come right apart without having to pull very hard.


Step 7.  This is what the glue sections will look like once they're released.  Finger press them open.  This step will help your bias tape lay nice and flat later so it's worth taking the time to do.  Release the glued sections of the entire strip.


Step 8.  Then trim all of your seams down to about 1/4 inch and trim off any overhang above or below the bias strip.


Step 9.  Flip the bias strip over and press one more time from the top.  You can see in the picture above that the bias seam is less noticeable than a straight seam would be.  It holds up to wear and tear much better as well because there is less stress on the seam.


Now your bias strip is complete and ready to use as is or for single fold bias tape (above), double fold bias tape (below), or piping.


I used this bias strip for a fun Valentine's day present for Bean.  I alluded to it here, but will finally show you the whole project on Wednesday.  So if you'd like to see how this bias strip looks when used for piping think about coming back later this week to check out this surprise present:


Even if it seems like way too many steps to you, I encourage you to try this method.  I have highlighted every step so that there would be no confusion, but it actually goes very quickly because you're doing each step assembly line style.  I'd love to hear what you think.  I also use Elmer's for temporarily holding down the binding on quilts so I can hand sew them without sticking myself with pins.  What about you?  Do you use glue for any sewing techniques?