


If the Brady Bunch taught us anything it's that spring is a Time To Change and as Bean will be three in May I thought it was the perfect time to change her high chair seat into a booster. That meant she would be eating off of the table with us instead of her tray so I needed to whip something up to protect our table.
For those of you who haven't seen my other table quilts you can take a look here and here. I prefer a table quilt to a table cloth for obvious reasons:
- There is elastic around the bottom edge so it stays put.
- The quilt padding protects from excessive toddler cup banging force.
- The texture adds some interest to the table top.
- Reversibility makes it easy to change the look of the room with just a flip of the quilt.

Jo-Ann has these great reversible pre-quilted fabrics that make it super easy to make your own reversible table quilt. This floral and somewhat paisley fabric caught my eye and I knew we needed it in our kitchen. I decided to use a cool geometric patterned fabric to hold the quarter circle sections of floral fabric together. I loved the idea of making an x (or a +) shape on the quilt top to bring in even more geometric interest to the quilt. Splitting the circle into quarters and holding them together with bias strips is also a great way to use the quilted fabric which has a width of 44" for a table that has a larger diameter.
To make your own Reversible Round Table Quilt customized to your table size you will need the following:
Quarter circle template (I'll show you how to make yours below)
Reversible quilted fabric (my measurements used a yard)
Quilting cotton (my measurements used slightly less than a yard)
Single fold bias tape (my measurements used about 2 1/4 yards)
1/2" elastic (I used about 2 1/2 yards)
Elmer's School glue (optional)
To begin you'll need to measure the diameter of your round table. That is the measurement straight across the center. Our table is 48" across and I plan to use a 1/4" seam allowance so the diameter of my finished circle needs to be 48 1/2" before we attach the band around the edge. Divide that number in half and each of our quarter circles will need to be 24 1/4".

To make your quarter circle template you need to measure a line that is 24 1/4" long and then one perpendicular that is 24 1/4" long. Directly between them and out from the corner (at 45 degrees) measure another line that is 24 1/4" long.

Cut the paper along the outside two lines. Now we'll fold the two outside edges so they are touching. I find with a pattern this large it is easiest to tape the bottom edge down so it won't shift while folding.

Fold the new top edge (with the previous fold) down to the bottom edge, taking care at the pointed end. Continue to do this as many times as you can with your big pattern piece.

Once you have the piece folded up use the original measurements to cut across the end at 24 1/4".

The more you've been able to fold the piece the more circular the resulting shape will be, but be sure to cut as straight as possible across the end.

Once you unfold the piece it will now be in the shape of a quarter circle. Press the pattern to get rid of the fold markings so the pattern will lay flat.

Cut out 4 of these pieces from the quilted fabric. I was able to get all four pieces from 1 yard of fabric.

Now you will need some single fold bias tape. I made my own using this method and the geometric print fabric.

Line up two of the quarter circles so the edges butt each other and do NOT overlap. Lay one edge of the bias tape on top of the center straight edge and using Elmer's School Glue (it will wash away once you wash the table quilt - read more about it here), press with an iron to temporarily hold the bias tape in place. You want to make sure that half of the bias tape is hanging over the edge of the pieces as it will be used to attach the other two quarters of the circle in a later step.

Sew along the edge of the bias tape that has been glued down until you reach the end of the second quarter circle.

When you've finished sewing the one side of the bias tape down the two quarter pieces will be attached at their pointed ends only.

Repeat the same steps using the other two quarter circle pieces, but have the reverse side of the quilted fabric facing up.

Once one edge of the bias tape (binding) has been sewn to each pair of quarter circles we'll need to sew them together. Butt the edges of the quilted fabric together and make sure both the bias tape on the top and the bias tape on the bottom's edges overlap to the adjoining edge.

Be sure all four corners of the quilted fabric line up under the bias tape and then glue down the free edges on the top and bottom of the circle. You'll have to flip the circle over once the bias tape on the top is glued in order to reach the bias tape on the bottom.

To sew the bias tape down to the free edge you could either hand stitch along the glued side or machine sew from the reverse side along the previous stitches. Do this to both sides of the circle so that the four quarter pieces are secured together along their center edge.

This is what your circle will look like at this point. Both edges of the vertical bindings on both the top and bottom of the quilted circle have been sewn, securing the quilted edges together and hiding the raw edges. The horizontal edges are still free.

Now you will sew another strip of the bias tape down to the horizontal edge of both sides of the quilted circle, forming an x or a + with the binding, using the same method as above.

The quilted circle is now complete and should measure 48 1/2" across.
It's time to move on to the outside edge (circumference) of the table quilt. For the band we'll use a strip of quilting cotton long enough to go around the edge of the quilt. You'll need to sew some strips together to make such a long band. Again, you can use my method explained here. The width of the strip should be 2 X the height of your table (mine is 1") plus 3" for the elastic casing and room for it to wrap under the table. The length of the strip can be determined by calculating the circumference and adding 5 inches to that for overlap. Or you can just wing it, make an extra long strip, and cut the excess off after you've pinned the strip and know you have the proper overlap. With my measurements I used a little less than a yard of quilting cotton.

Fold the strip in half lengthwise and press wrong sides together. Pin the raw edge to the outside edge of the circle until the strip overlaps.

Sew the overlapping edges together so you have one long circular strip that fits the outside edge of the quilted circle. Cut off the excess fabric. Sew the strip to the quilted circle along the raw edge, leaving an opening at least 2 inches wide to insert the elastic.

Trim the edge.

By the way, the pictures above are a great view of the true colors of these quilted fabrics. The colors are just like in these pictures.
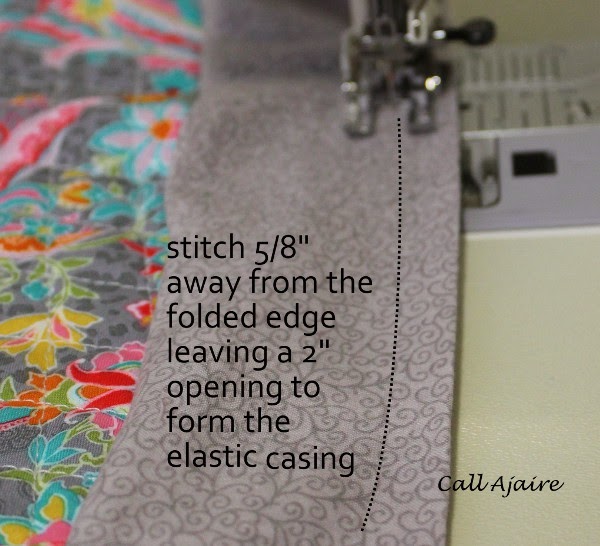
Press the 1/4" seam allowance toward the outside edge of the circle and starting at the same part of the circle as you did for the previous seam, stitch 5/8" away from the folded edge to create the elastic casing. Make sure to leave the same 2 inch open for inserting the elastic.
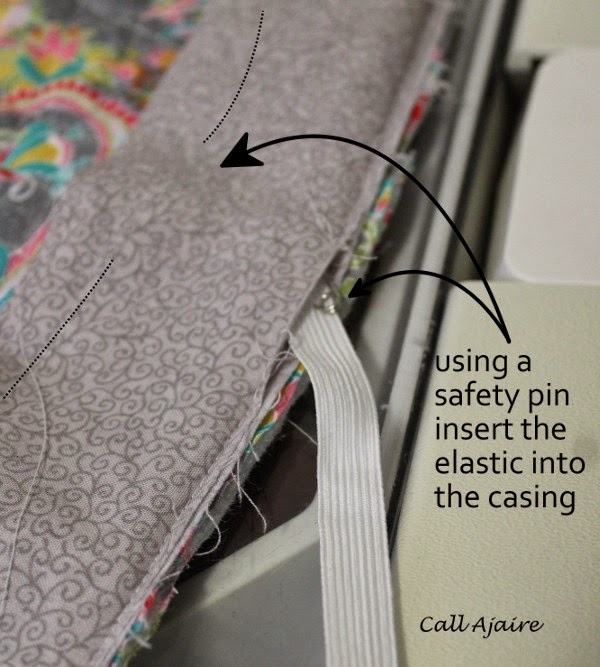
Using a safety pin, insert the elastic through both 2 inch openings and feed it all the way through the casing.

Once the elastic is in place, sew the ends together and close the two openings. Then, using a zigzag stitch, sew the raw edge of the quilted circle to the outside band to prevent fraying of the raw edge. Plus, I like the look of the zigzag around the edge of the circle, hehe.

And your Reversible Round Table Quilt is complete!

The reverse side is just as pretty as the main side too.
Now that we're done with #craftmonthlove, you should go take a look at the other crafts on the spring crafting inspiration website and don't forget about that Jo-Ann Fabrics coupon too.
And I'd love to hear what you think about these spring trends: Radiant Orchid, Nautical, Florals, Geometric. I'm kind of excited about the Nauticals too.
I know why you really made an x on top. So you each will have your own area on the table and no one will take up too much space !
ReplyDeleteYes and the fourth spot is for Jesus. He's always trying to crowd my space.
ReplyDelete