social media links

Thursday, March 20, 2014

Monthly MashUp (3) Izzy Top and Belinda Dress

If you're looking for the details of this monthly series you can check out the introduction post.

Monthly MashUp - with Call Ajaire

For March's Monthly MashUp I'm excited to include a pattern that is available for free.  I posted a couple of weeks ago about my first Izzy top and I knew this amazing pattern from Climbing The Willow would be perfect for a MashUp.  I immediately jumped on the pocketed skirt from the Belinda Dress by Go To Patterns (*affiliate link) as the perfect pairing for the MashUp and I think you guys are going to love it!


The shape of the Izzy Top bodice is unique enough to make it interesting even without the skirt that comes with the pattern.  I like that the faux cap sleeves are part of the bodice so they look adorable without the fuss of a set in sleeve.  The bodice is fully lined which is also a plus.  I just love when a garment looks as good from the inside as it does from the outside.  The sizes range from 18 months to 12 years so this is a top that we'll use for many years to come.  There's also a super cute elastic casing option for the bottom edge of the skirt which will probably be the next Izzy I make for Bean.


The Belinda Dress (*affiliate link) by Andrea Pannell for Go To Patterns was designed as part of Andrea's Designer's Challenge.  She challenges other designers to create something unique to the market so why not challenge herself along with them, right?  This is one of my favorite of Andrea's patterns and we all know how much I already adore her Anywhere dress.  The big kangaroo pocket in the bubbly skirt is such a fun feature.  The bodice is meant to have a bit of stretch, but even a sweatshirt knit that doesn't have a ton of stretch will work as long as you can stretch the neck to go over the head.  The skirt/pocket portion is again meant for knit fabric, but woven apparel fabrics will work as well.  Bonus: for those of you who already own the Anywhere dress the sleeves work for this dress too!  That means you have the option for the puffed sleeve or no puffed sleeve.  My favorite is the 3/4 length Anywhere Dress sleeve with band so that alone was enough to sell me on this pattern initially.


This MashUp is super easy.  Since I'm currently trying to sew ALL THE THINGS for Project Run & Play (which starts on Monday) an easy MashUp was in order.  I'd had this one waiting in the wings so it was as if it was meant to be March's MashUp all along.  The great part about this MashUp is that since you can use woven fabric for the Izzy Top, it opens up lots of fun fabric pairing possibilities.  If you've been following me long enough, then you know I love mixing knit and wovens so this is a really fun MashUp for me.


To start with, follow the Izzy pattern instructions for the bodice up through attaching the lining.  I like to press the bottom edge of the lining up 3/8" before sewing it all together so later when I go to sew the lining along the bodice edge to cover all the raw edges it will already be pressed in the right position.  When you sew the lining to the main fabric, start and stop sewing along the back edges (where it will butt together) about 1/2 inch from the end.  This is so that the lining and main fabrics will not be attached at the bottom edge, nor it's seam allowance.  Do not sew the side seam yet either.


Lets move on to the skirt portion of the Belinda dress which is simply gathered to fit the Belinda bodice so there is no need to alter any pattern pieces!  The Izzy bodice cuts off higher than the Belinda bodice so if you're concerned about length than you may want to add a couple of inches to the skirt length before you gather it.  I found the length to be perfect without adjusting since Bean will be wearing this with leggings or tights until it's a tunic anyway.


Attach the skirt pieces to the front and back main bodice pieces, making sure the lining is not caught in the stitching.  When you sew the back skirt piece to the back bodice pieces, also make sure they butt up to each other so there is no gaping in the back.


To sew the side seams, simply follow the Izzy instructions for sewing the side seams with the lining, but continue down the skirt sides as well.  Once the sides are sewn you can flip the bodice lining inside the dress and since the lining bottom edge is already pressed over, you can stitch along the bottom bodice edge from the right side to secure the folded edge and contain the raw skirt/bodice seam.


Attach the Belinda band to the bottom of the skirt and your MashUp is complete!


The curved shape of the bottom edge of the bodice makes the Belinda skirt bubble out even more which is super cute.


And lets not forget about the giveaway!  In lieu of giving away the Izzy Pattern (it's already free!), Teri has offered the winner's choice of one of the three fabric pair bundles above.  That includes enough fabric to make an Izzy/Belinda MashUp of your own!  Of course if you're going to be making your own MashUp, you'll need the Belinda pattern which Andrea has generously offered to giveaway to the winner too!

Just follow the instructions in the rafflecopter below to enter the giveaway.  Due to international postage the fabric portion of the giveaway may not be open internationally, but the pdf pattern is!

a Rafflecopter giveaway

Want to MashUp your own, but don't want to wait until the giveaway is over?  You can purchase the Belinda Dress pattern here (*affiliate link) and the Izzy Top pattern is available for download here.


Be sure to follow the Monthly MashUp Pinterest board if you'd like some more inspiration on garments to mash.  And remember, if you do a MashUp I'd love it if you would share it in the Call Ajaire Monthly MashUp Flickr group!  There are a few great ones out there in the group already and I'll feature a few with the giveaway winner announcement next week.

Call Ajaire Monthly MashUp
<a href="http://ajaire.blogspot.com/search/label/Monthly%20MashUp" target="_blank"><img src="https://blogger.googleusercontent.com/img/b/R29vZ2xl/AVvXsEi1QaqRN54YV5eIpr-nbvuESs6hHOsDFaMODZGPwnVmLdGK0WCIYxnF7W4dZ8eOpKDmR7oCYL_5hvysYBodMWplhjguDoc0ZpyH9QMsGqN4sm3RHmMlUNTuok4VnzI-G48rr3O_8iweIsqZ/s1600/Monthly+MashUp+graphic+600px.png" alt="Call Ajaire Monthly MashUp" width="125" height="125" /></a>

**the fabric and pattern for the giveaway has been generously donated, but all opinions are mine and I purchased my own pattern before contacting the designers.

Monday, March 17, 2014

Spring Trends - Reversible Round Table Quilt

Even though we were dumped with another round of snow overnight, spring is right around the corner so it's time to start dreaming of longer days and warmer weather.  March is National Craft Month so a fun spring trend inspired craft was in order.  My favorite trends this spring are the floral and geometric patterns.  Below you'll see I used a great mix of the two to update our kitchen table with a new Reversible Round Table Quilt.  If you're looking to make your own spring trend crafts, Jo-Ann Fabrics and Craft Stores has a $5 off $25 or more coupon and a spring crafting inspiration website.  There are lots of great projects up there so it's worth a look. This is a sponsored post, but as always all opinions are mine.


If the Brady Bunch taught us anything it's that spring is a Time To Change and as Bean will be three in May I thought it was the perfect time to change her high chair seat into a booster.  That meant she would be eating off of the table with us instead of her tray so I needed to whip something up to protect our table.

For those of you who haven't seen my other table quilts you can take a look here and here.  I prefer a table quilt to a table cloth for obvious reasons:

  • There is elastic around the bottom edge so it stays put.
  • The quilt padding protects from excessive toddler cup banging force.
  • The texture adds some interest to the table top.
  • Reversibility makes it easy to change the look of the room with just a flip of the quilt.


Jo-Ann has these great reversible pre-quilted fabrics that make it super easy to make your own reversible table quilt.  This floral and somewhat paisley fabric caught my eye and I knew we needed it in our kitchen.  I decided to use a cool geometric patterned fabric to hold the quarter circle sections of floral fabric together.  I loved the idea of making an x (or a +) shape on the quilt top to bring in even more geometric interest to the quilt.  Splitting the circle into quarters and holding them together with bias strips is also a great way to use the quilted fabric which has a width of 44" for a table that has a larger diameter.

To make your own Reversible Round Table Quilt customized to your table size you will need the following:

Quarter circle template (I'll show you how to make yours below)
Reversible quilted fabric (my measurements used a yard)
Quilting cotton (my measurements used slightly less than a yard)
Single fold bias tape (my measurements used about 2 1/4 yards)
1/2" elastic (I used about 2 1/2 yards)
Elmer's School glue (optional)

To begin you'll need to measure the diameter of your round table.  That is the measurement straight across the center.  Our table is 48" across and I plan to use a 1/4" seam allowance so the diameter of my finished circle needs to be 48 1/2" before we attach the band around the edge.  Divide that number in half and each of our quarter circles will need to be 24 1/4".


To make your quarter circle template you need to measure a line that is 24 1/4" long and then one perpendicular that is 24 1/4" long.  Directly between them and out from the corner (at 45 degrees) measure another line that is 24 1/4" long.


Cut the paper along the outside two lines.  Now we'll fold the two outside edges so they are touching.  I find with a pattern this large it is easiest to tape the bottom edge down so it won't shift while folding.


Fold the new top edge (with the previous fold) down to the bottom edge, taking care at the pointed end. Continue to do this as many times as you can with your big pattern piece.


Once you have the piece folded up use the original measurements to cut across the end at 24 1/4".


The more you've been able to fold the piece the more circular the resulting shape will be, but be sure to cut as straight as possible across the end.


Once you unfold the piece it will now be in the shape of a quarter circle.  Press the pattern to get rid of the fold markings so the pattern will lay flat.


Cut out 4 of these pieces from the quilted fabric.  I was able to get all four pieces from 1 yard of fabric.


Now you will need some single fold bias tape.  I made my own using this method and the geometric print fabric.


Line up two of the quarter circles so the edges butt each other and do NOT overlap.  Lay one edge of the bias tape on top of the center straight edge and using Elmer's School Glue (it will wash away once you wash the table quilt - read more about it here), press with an iron to temporarily hold the bias tape in place.  You want to make sure that half of the bias tape is hanging over the edge of the pieces as it will be used to attach the other two quarters of the circle in a later step.


Sew along the edge of the bias tape that has been glued down until you reach the end of the second quarter circle.


When you've finished sewing the one side of the bias tape down the two quarter pieces will be attached at their pointed ends only.


Repeat the same steps using the other two quarter circle pieces, but have the reverse side of the quilted fabric facing up.


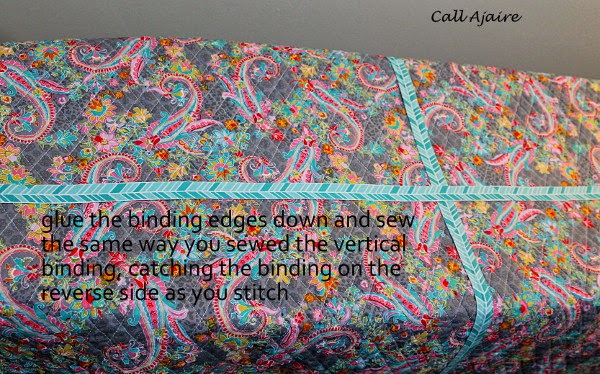
Once one edge of the bias tape (binding) has been sewn to each pair of quarter circles we'll need to sew them together.  Butt the edges of the quilted fabric together and make sure both the bias tape on the top and the bias tape on the bottom's edges overlap to the adjoining edge.


Be sure all four corners of the quilted fabric line up under the bias tape and then glue down the free edges on the top and bottom of the circle.  You'll have to flip the circle over once the bias tape on the top is glued in order to reach the bias tape on the bottom.


To sew the bias tape down to the free edge you could either hand stitch along the glued side or machine sew from the reverse side along the previous stitches.  Do this to both sides of the circle so that the four quarter pieces are secured together along their center edge.


This is what your circle will look like at this point.  Both edges of the vertical bindings on both the top and bottom of the quilted circle have been sewn, securing the quilted edges together and hiding the raw edges.  The horizontal edges are still free.


Now you will sew another strip of the bias tape down to the horizontal edge of both sides of the quilted circle, forming an x or a + with the binding, using the same method as above.


The quilted circle is now complete and should measure 48 1/2" across.

It's time to move on to the outside edge (circumference) of the table quilt.  For the band we'll use a strip of quilting cotton long enough to go around the edge of the quilt.  You'll need to sew some strips together to make such a long band.  Again, you can use my method explained here.  The width of the strip should be 2 X the height of your table (mine is 1") plus 3" for the elastic casing and room for it to wrap under the table.  The length of the strip can be determined by calculating the circumference and adding 5 inches to that for overlap.  Or you can just wing it, make an extra long strip, and cut the excess off after you've pinned the strip and know you have the proper overlap.  With my measurements I used a little less than a yard of quilting cotton.


Fold the strip in half lengthwise and press wrong sides together.  Pin the raw edge to the outside edge of the circle until the strip overlaps.


Sew the overlapping edges together so you have one long circular strip that fits the outside edge of the quilted circle.  Cut off the excess fabric.  Sew the strip to the quilted circle along the raw edge, leaving an opening at least 2 inches wide to insert the elastic.


Trim the edge.


By the way, the pictures above are a great view of the true colors of these quilted fabrics.  The colors are just like in these pictures.


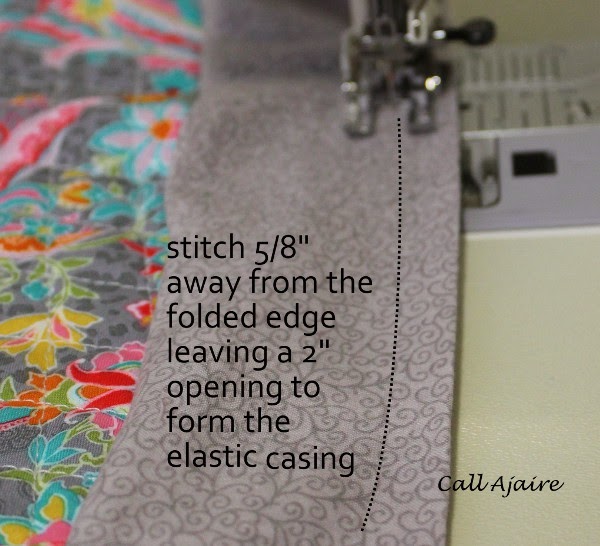
Press the 1/4" seam allowance toward the outside edge of the circle and starting at the same part of the circle as you did for the previous seam, stitch 5/8" away from the folded edge to create the elastic casing.  Make sure to leave the same 2 inch open for inserting the elastic.


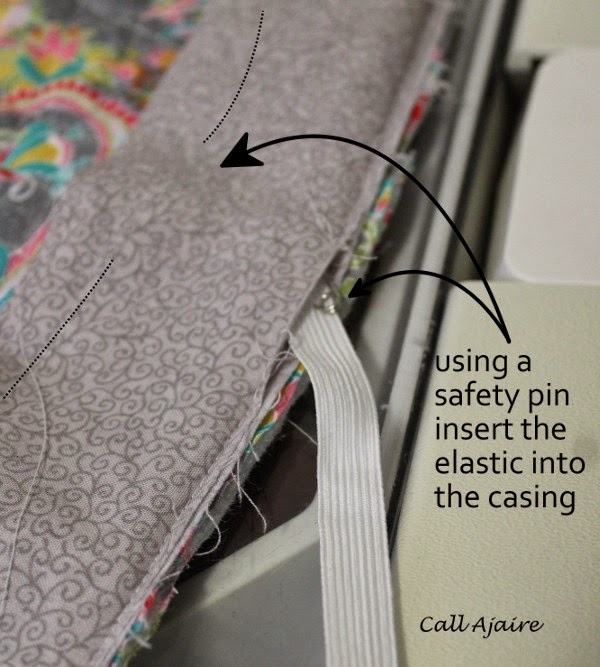
Using a safety pin, insert the elastic through both 2 inch openings and feed it all the way through the casing.


Once the elastic is in place, sew the ends together and close the two openings.  Then, using a zigzag stitch, sew the raw edge of the quilted circle to the outside band to prevent fraying of the raw edge.  Plus, I like the look of the zigzag around the edge of the circle, hehe.


And your Reversible Round Table Quilt is complete!


The reverse side is just as pretty as the main side too.


Now that we're done with #craftmonthlove, you should go take a look at the other crafts on the spring crafting inspiration website and don't forget about that Jo-Ann Fabrics coupon too.

And I'd love to hear what you think about these spring trends: Radiant Orchid, Nautical, Florals, Geometric.  I'm kind of excited about the Nauticals too.

Friday, March 14, 2014

Meanwhile...

Sorry I've been a little MIA over the past week, but I've been busy, busy behind the scenes, I promise.  My Bio is up today on Project Run & Play's site, which of course makes everything seem more real and stressful, hehe.

Season 9 starts on the 24th of March and there is lots to do before it gets here.  I have a couple of fun things to post next week that are not Project Run & Play related so you can look forward to that, too.


In the meantime, here is a picture of a couple of cute newborn things I made for one of my friend's new baby girl.  She's a foster baby so even though they will probably not be able to keep her forever, I wanted to send something she could wear while she is in their care.  The pants were self drafted ages ago and they are super quick to make.

The jumper is the Jamie Jumper from the Little One Layette patterns by Fishsticks Designs.  I love this pattern.  I drafted a similar one with a zipper when Bean was a baby, but who knows were that pattern went so I opted to print out this Fishsticks one.  Also, sometimes it's easier when sewing for someone else's kids to just use a pattern you trust for sizing, you know?


Speaking of sizing, I like to throw a tailor's tape (*affiliate link) into the gift box that the receiver can throw in their junk drawer so the next time I call asking for their kid's sizes they'll be able to take them.  I've had enough conversations where I explain that first you'll need to put a string around the kid's waist and then measure the string only to have the parent explain that they don't have string.  So even though dental floss would work in a pinch (except everyone's using those dang placker things now), it's a lot easier to just send along a flexible tape measure, hehe.

Anyway, be sure to check back next week to see just what I've been getting up to behind the scenes over here!

Thursday, March 6, 2014

My First Izzy Top

I've had my eye on Climbing The Willow's Izzy Top for ages now and I finally sewed one up for Bean.  It's a free pattern and tutorial that she offers in sizes 18M - 12!  That's incredibly generous.  If you don't know Teri from Climbing The Willow yet, its worth your time to check out her amazing my tutorials page because there is so much good stuff on there.


Anyway, I think it's the basic design of the top that caught my eye.  I like when a design is simple, yet has some interesting quality and in this case it's the curved yoke.  The curve makes my eye catch the skirt fabric more than a straight bodice would so I think it's a great way to feature a woven fabric you've been hoarding.


I sewed the 3T size since Bean is growing and growing and growing.  I hear a lot of moms talk about their older kids being 2T with size 6 length or 18M with size 4 length and I crack up because Bean is not even 3 yet and she's a solid 3T with practically a 4T length already.


I used some of my Fort Firefly Camp fabric by Teagan White.  Man do I love her designs.  I also bought the yellow fireflies in a jar (can't recall the name) from the same collection and I'm hoarding it until Bean is old enough to understand how cool fireflies are.  This summer should do the trick; we get a crazy amount of fireflies in our yard every year.


The solid blue fabric is more stretch sateen from JoAnn.  I have had such great results with their stretch sateen and I have it in many colors.  I've been seeing some florals pop up lately so I'll have to keep my eyes open for it the next time I'm there.  It's my favorite bottom weight fabric because it gives some strength and body to a garment, but still has a bit of stretch to it.  It washes and dries in the machine great without much shrinking.  Plus it has a subtle shine to it so it's a little more interesting than a plain solid.


This top is one of those speedy speedy sews too.  As you may know I am competing in Project Run & Play at the end of this month so my mind is spinning with design ideas.  I needed a quick sew that doesn't need a lot of concentration to sort of quiet my brain for a bit.  Does anyone else do that?  When I was in college and taking advanced computer science courses my mind would constantly be working out whatever algorithm we were working on at the time.  Some of my classmates were the type where their brain would focus somehow just before falling asleep and they would jump up and have to jot down notes before they lost the idea forever.  I on the other hand would just start cross stitching or knitting or something else active with my hands that didn't take a lot of concentration and somehow that would be enough to let my brain solve the problem in the background.  When I write that out it sounds a bit crazy, so now I'm definitely curious about all of your creative processes!

Tuesday, March 4, 2014

On Quilting...

Sometimes I like to make quilts.  Baby quilts are the best because they aren't very much commitment in terms of the actual quilting the whole thing together part.  I don't have a longarm sewing machine so jamming everything through my little Janome is not overly fun.  I've done some quilt as you go, but it takes more preparation than I find I have time for these days.  A small quilt is easier to manage so the majority of quilts I make now are baby/toddler size. (although my table quilts are a little bigger than that)  


When my best friend Angela had her first baby, of course I made her a quilt.  This was way back when we were still living in Washington state.  Okay, it wasn't so long ago, but 2008 seems like ages when I think about all that has changed in our lives since then.  


Anyway, she was having a girl and is obsessed with cats so of course I had to have lots of pink and include some cats on there.  I saw somewhere a quilt where these cat shadow appliques were walking up some steps under the moonlight and I liked the idea so I mixed it up a bit for a baby theme.  I turned the steps into alphabet blocks and when I realized the size and arrangement of the blocks would only allow for 25 letters, I used the first letter of the baby's name in place of the moon so I would have the whole alphabet on the quilt.  I really love how this one turned out.  This was back when I had more time on my hands and fewer interruptions... clearly, hehe.


Angela studied abroad in Paris and she loves anything french inspired.  When she found these Paris cats (a Benartex design) we both fell in love with them and I used the fabric for the back of the quilt and some of the blocks on the front.


In 2012 Angela was expecting her third baby and her husband wanted to be surprised when she delivered so he didn't find out the sex.  She decided the best way to handle the surprise was to send the sonogram to Spoonflower and then send the fabric to me to make a quilt with it.  Ah, the things pregnancy does to our brains, hehe.  I wasn't sure how I was going to use an "it's a boy" sonogram in a baby quilt, but I think it turned out great.


He is their only boy so we had to go all out and use her husband's favorite British football team logos all over the back of it too.  


Of course, I also used some french script fabric and blue British kitties in the mix to satisfy Angela's tastes.  The patterns I used for the quilt all came from the free patterns offered on the Quilter's Cache.  Rings in Motion for the center with the sonogram, Crossroads 2 for the corner squares, and Mock Logs for the other squares.  I like taking different patterns and mixing them up.  Planning a quilt is probably my favorite part of the process.

proof that I actually made her something: wearing the blue microfleece bubble skirt I made her at Halloween

All this is to say that somehow when Angela had her second daughter I never made her a quilt!  I don't remember exactly why, and I know I've made her other things, but I never got around to making her a baby quilt.  Maybe it was because I was pregnant with Bean at the time?  I have no idea, but she was turning three in February and it was high time to remedy the no-quilt situation.


This was a fun quilt to make because she is old enough to have some of her own interests.  As most little girls, she is obsessed with princesses and since her older sister has already claimed ALL THE PINK, she says blue is her favorite color.  So I used lots of princess fabric and made some bias binding with my Quickie Bias Tape method using some sparkly blue fabric to help the blues stand out a bit more.


I used the Broken Herringbone tutorial found here for the front blocks.  I had plans for how I would arrange the blocks, but then once I had them all sewn I was second guessing myself.  My original plan was to arrange them in a swirl shape (similar to how I arranged the baby boy quilt) like the top left above.  But then I liked the way the blue strips were flowing in the top right arrangement.  I quickly took pictures of two other arrangements I liked and posted this pic to Instagram to see what everyone else thought.  I got a lot of feedback in favor of the bottom left and a few with the top right.  


In the end I decided to go with the top right, but I replaced the pink triangle shapes at the point of the blue strips so it would look a little cleaner.  I knew I would be quilting using a swirly shape that would start in the center and make its way out, so I thought the swirling legs of this arrangement would be the best complement while still featuring some of the blues.


I took this picture and some of the front side before washing the quilt.  Does anyone else take before pictures to prove that you did indeed create something nice just in case the washing machine or dryer eats it the first time?  I am always SO nervous even though I've never had an issue.  The rest of the pictures above are all post laundry so they have the extra wrinkles a quilt should have and all the starch/Elmer's glue has been washed out.

The back came out really nice too.  I was so pleased with how the quilting worked out.  It was really fast once I got the swirl started and speed is key these days.  Angela sent me the bird fabric used on the back since that is what was used for her bedroom.  I thought the colors went well with the princess fabric and I hope she likes it.  


And of course I threw a little french fabric in there for Angela.  It's hard to tell in these pictures, but the pink fabric is an Eiffel Tower print.  I used it for the center triangles and a few of the smaller ones on the front.  My sister used the same fabric here for a key fob card holder thing and I didn't even make the connection until she saw it on Instagram and said she thought it was the same!

Now for those of you with regular sewing machines that do some quilting, I have a question.  How do you manage the quilting part?  I find it so frustrating to maneuver those big quilts, but maybe you have a solution I haven't thought of.  I'd love to hear any tips!