


To make her floor cushion more Valentine themed I decided to make it in the shape of a heart. I made it a chubby heart so it'd still be a roundish shape though, hehe. I used some home decorating weight fabric from JoAnn that I had left over from the faux roman blinds I made for Bean's room when she was a baby. (hmm maybe I should write a post about them someday...) I thought it'd be fun to coordinate the cushions with her room.

I also made a round cushion cover so if we're not feeling Valentine-y we can swap it out. Yes, that's two removable cushions and one inner cushion. But really it all sews up so fast I was excited to do it. The only hard part is getting all those beans in the inner cushion, but with my "funnel" technique we've already sailed past that step. The rest is gravy. I'll start by describing how I made the round cushion because other than the closure, they are made the same way.

To make a round shaped removable cover for your inner floor cushion you'll need:
two circles with a 20" diameter cut out of your cushion fabric
piping (much more than shows in this picture - you can see how I made the bias tape for the piping here)
a band of fabric 10 inches high by about 68 inches
two rectangles of fabric 3.5" by 8" for making a handle (optional)
snaps (*affiliate link)

Step 1. Baste the piping onto both of your circles.

Step 2: To make the (optional) handle you need to sew the two smaller rectangles with right sides together leaving an opening for turning. I added piping to the sides of mine which you could do before sewing them together. Once your rectangle is turned right side out and has been pressed you will want to add it to the band. It's much easier to add it now before the band has been sewn to the cushion pieces.

Step 3: Simply pick a spot in the center (vertically) on the band and sew each side down securely as you see in the picture above.

Step 4: Pin the band right sides together to one of the circles, leaving overhang on each end of the band. You'll want at least three inches left over on each side. Mark where the bands meet at the circle with a pin. (don't notch like you did with the inner cushion)

Step 5: Move over to the ironing board and press down each side making sure that when you repin the band to the circle the two ends will overlap at least two inches.

Step 6: Repin the band to the circle, overlapping the two band ends.

Step 7: Sew along the perimeter of the circle. Notch seam so it will turn nicely.

Step 8: Pin the top of the band edges together so they are overlapping evenly with the bottom edge.

Step 9: Pin the top circle onto the band right sides together making sure the overlapping band ends are pinned down as well.

Step 10: Sew around the perimeter of the circle catching the overlapping bands. There is no need to leave an opening since the opening at the band ends (from the overlap) will be what you'll use to turn the cushion cover.

Step 11: Turn the cushion right side out and admire the nicely folded overlapping opening. This will become your snap placket.

Step 12. Get out your snaps and snap tool. I really love this snap tool (*affiliate link) I bought last year for making my Simple Toddler Belts (spoiler alert there's video of me on that post, hehe). I can't recommend it enough. These plastic snaps are great for kids and I've stocked up on many colors.

Step 13. Admire your pretty snaps. It's hard to tell in this picture, but these pink snaps have a butterfly pattern embossed on them. Super cute.
Now that we've finished the round floor cushion let's move on to the heart shaped one. Many of the steps are the same, but I'll highlight the ones that are different.
To make a heart shaped removable cover for your inner floor cushion you'll need:

two heart shapes cut out of your cushion fabric - mine are about 30 inches wide by 20 inches high
piping (you can see how I made the bias tape for the piping here)
two bands of fabric 10 inches high by about 25 inches
a 10 inch high by about 15 inch wide piece of band which has an invisible zipper running down the middle
two rectangles of fabric 3.5" by 8" for making a handle (optional)

Step 1: Baste the piping onto both of your heart shapes. Take care around the points at the center. You may need to clip the piping seam allowance to lay nicely on the points.

Step 2: Sew one band of fabric to each of the ends of the invisible zipper piece. Now you have one long band with an invisible zipper at the center and two open ends.
Step 3: To make the handle and sew it to the band please refer to Steps 2 and 3 for the round cushion above.
 |
| picture of the heart from last year |
Step 4: Pin the band to the outside edge of one of the hearts with right sides together. Where the band ends meet you will notch the band and sew it together. Please refer to steps 2 through 6 from the inner cushion tutorial for detailed pictures of this step.
 |
| another picture from last year |
Step 5: Sew the perimeter of the heart to the band and notch the seams. Take care at the points to turn the fabric and remember that clipping the seams will help it all to lie flat. Flip the seam right side out to make sure the points look nice.
Step 6: Pin the other heart to the band right sides together making sure to line up the points of the heart shape at the center. Once everything is pinned you can sew and notch the seams just like in steps 9 and 10 of the round cushion above.

Step 7: Flip the cushion right side out through the zipper hole and admire your lovely invisible zipper.
Now you have two cushion covers and an inner cushion made. The only thing left to do is stuff the inner cushion into one of the covers.

Start by bunching up one end of the inner cushion and then push that into the cover. The reason we made the inner cushion much bigger and not fully stuffed is so that it can be maneuvered through the small zipper and snap openings in the outer cushion cover. The extra room in the inner cushion allows the beans to be pushed through the opening into the inner cushion section that is already inside the outer cushion.

Push as much of the inner cushion into the cushion cover as possible. Then hold the whole thing vertical and try to shake the beans inside the covered section of the inner cushion. This takes some finagling, but trust me it works. Once you get past the half way point the inner cushion practically falls inside the outer cushion.

Once the inner cushion is fully inside the cushion cover just zip or snap the opening shut and shake the whole thing around until the inner cushion and its beans are snug into the edges of the cover.

So now that we're done (whew!) you may wonder why I went through all the effort to make a larger inner cushion and then jam it through a small opening in the removable cover. I'll admit that it would be a lot easier to just use an extra long zipper or make a snap placket that went half way around the perimeter of the cushion and please feel free to make yours that way if you'd like.

However, I have an extremely curious 2 year old in the house who is adept at zippers and would be all too willing to try to get at that inner cover. With a small opening there is much less chance of her getting in there and pulling out the inner cushion with all those beans! So for me it was worth it to spend the extra few minutes to get the inner cushion inside the opening. Let's do our best to keep those beans contained, hehe.
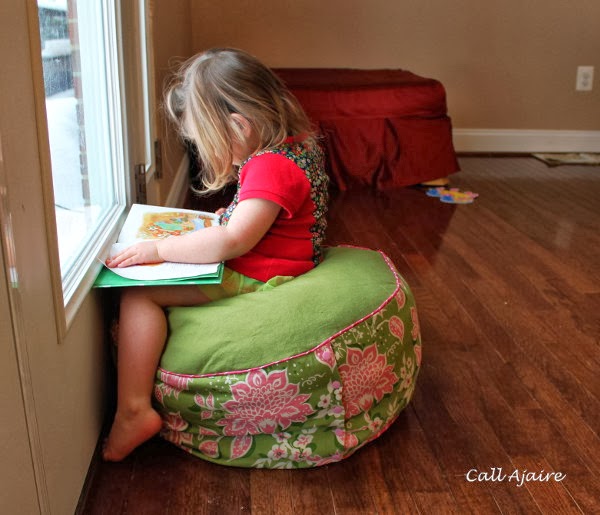
I gave Bean the round cushion cover this morning to keep her occupied during this very snowy morning. She loves it! I decided to give it to her early because I think it'll be more fun to have her see it "become" a heart shape for Valentine's day tomorrow than if I just gave it to her in its heart cover originally. I've successfully hidden the heart cover for now. I'm sure I'll post an updated heart cushion pic on Instagram tomorrow if you're curious to see how she likes it.
Is the heart one "successfully hidden" inside the round one?
ReplyDeleteThis looks great. Every time I see these cool floor cushions I want to make one. One day I will!
ReplyDeleteNeat! Looks like she's enjoying it!
ReplyDeleteMimi
Great tutorial! I think I could actually make this with your instructions.
ReplyDelete